Olden but golden…

While visiting my best friend who now lives in a little farmhouse in Puglia in Italy, we wandered around her vineyard one afternoon in the muted sunshine where she squealed and said to me “tell me what this tree is, hubby says it’s some kind of an Italian apple but they taste awful!” – I very confidently wrinkled my brow and said “my dear I am excited to tell you, I think you have your very own quince!” So we picked some apples and some quince and trundled back to the house, gossiping about life, the universe and Everything.

Then we drank mulled wine and made chutney from things she had lying around in the cupboard so we added some onions, ginger, garlic, chillies, salt, sugar, vinegar and bubbled it all away for an hour or two. I have never actually chutney-ed quince before and it did take rather a long time to cook down but the smell was fantastic and in a month or three, I am sure she and her family are going to enjoy a fantastic reward as they pop open a jar of home-made chutney, cobbled together with fresh produce from their very own land.

For years at home, I have scoured farmshops and country roads looking for these beautiful fruits. Some years back, on a long weekend in Edinburgh, we visited a fantastic Italian deli where we bought fresh cheeses and Artisan bread and membrillo, the Spanish version of ye olde quince ‘cheese’. We sat in a park and played frisbee on a sunny day and it will remain to me as one of those happy days you always remember. I’ve never found it to buy anywhere ‘darn sarf’ since, so vowed to make it myself if and when I could locate the main ingredient.

Then magically, an enormous Waitrose carrier bag of the largest quince I have ever seen appeared on my doorstep two days after I returned from Italy. I honestly couldn’t believe my luck. My next door neighbour had ‘procured’ them for me from another villager with a huge tree bursting at the seams. So I started to scour the Internet for an appropriate recipe.

quince

It turns out, there is not much involved in the old recipe at all. There are many newer incarnations of the original but I decided to go with the most basic. Many recipes describe pouring the mixture into a greased baking sheet then drying out in the oven, turning out, covering with a dusting of sugar and slicing into squares before storing. This is how I had the membrillo in Edinburgh, however I decided to pop mine into jars so that it would make storage and Christmas gifting all the easier.

I decided because of the original instructions to keep the skin on the fruit as well as all of the cores present during the initial cooking phase. As with apples, there is a large amount of pectin contained within these bits which we often discard at the off, and they will actually help the jelly to set without having to add any further pectin. And quite frankly I learned in Italy that these lovely fragrant souls are indeed the devil’s own work to peel so I am grateful not to have to. They are also incredibly hard even when ripe so use a sharp knife and keep your fingers well out of the way.

Basically there are only the following three ingredients: quince, sugar and water.

I scrubbed the fruit clean with a nail brush then roughly chopped, skin and cores and all. Quickly everything was submerged in a large stockpot with enough water to just cover. I do not need to give you a weight of quince as this is something you make with whatever you have and the recipe is totally adapted depending on your haul.

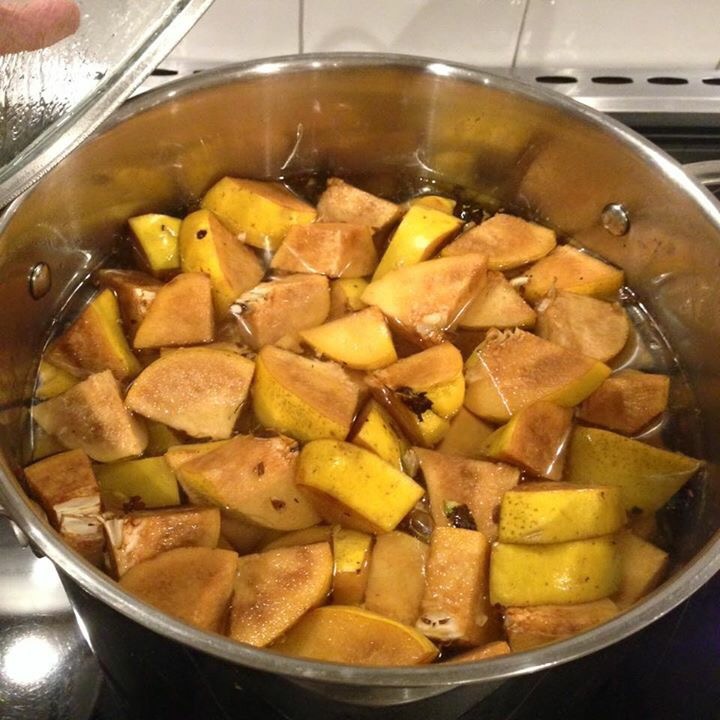
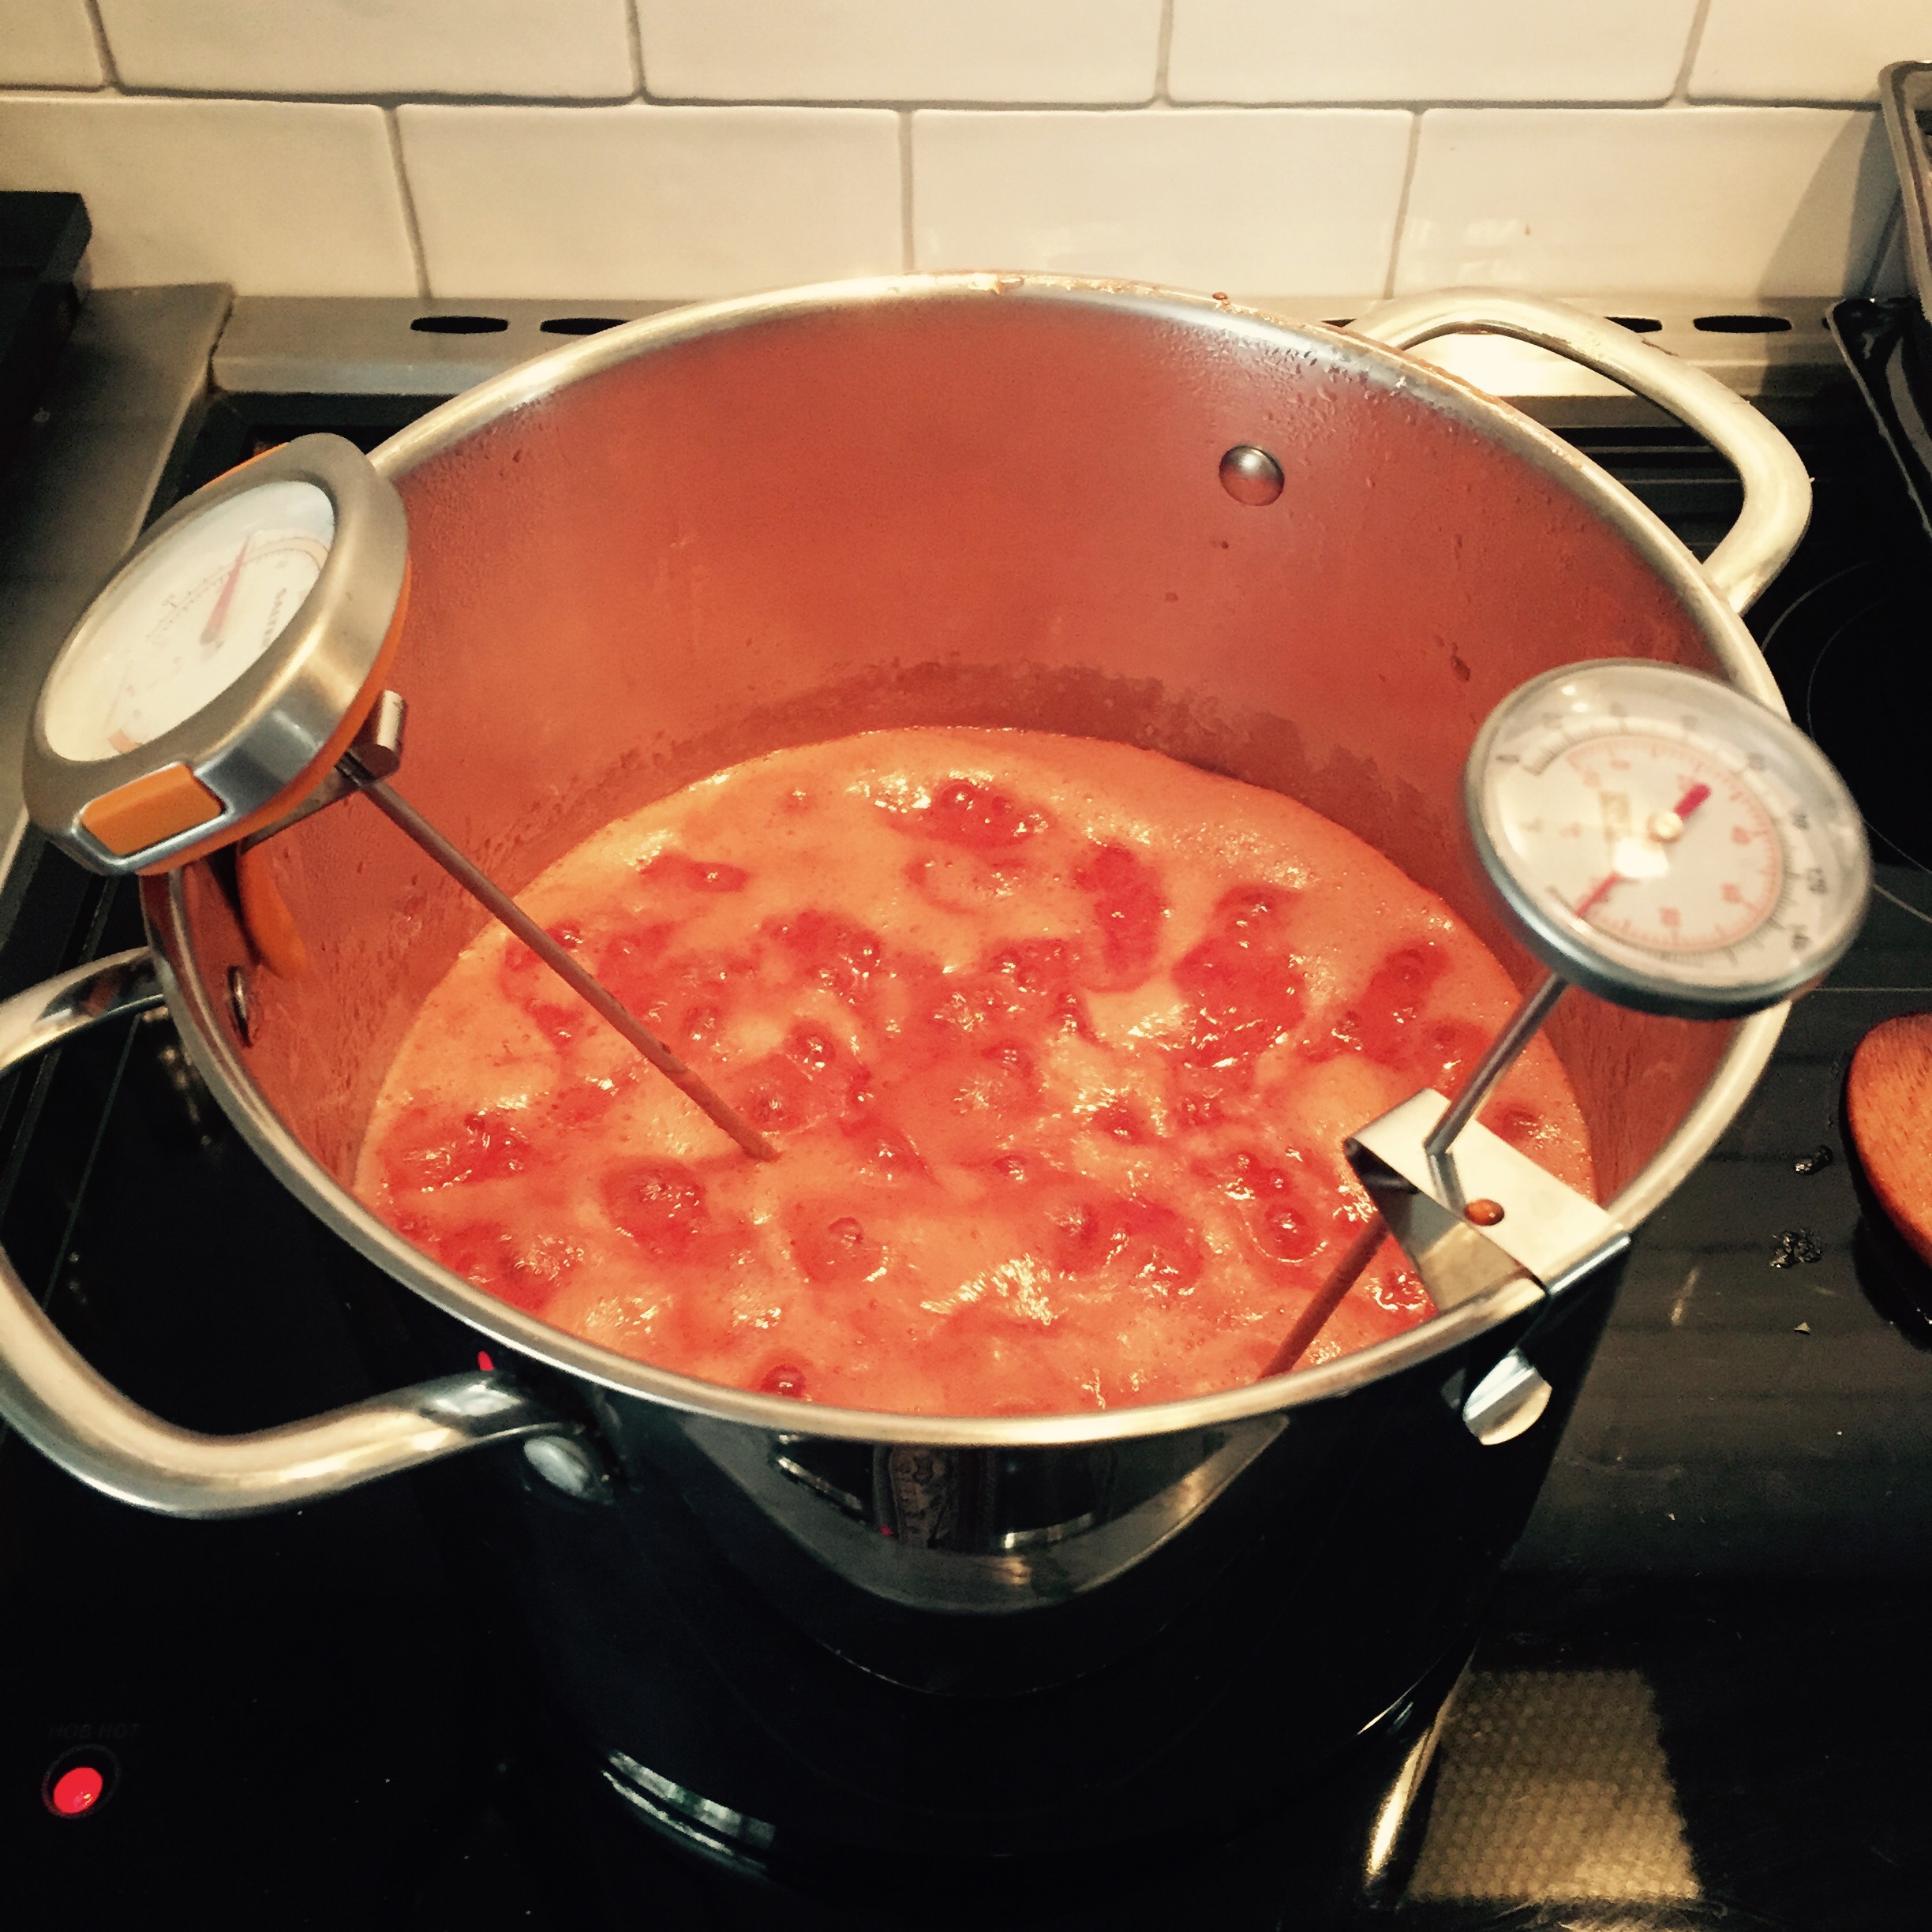
The next thing is to bring to the boil and leave on a medium heat to simmer gently for around 40 to 50 minutes until the fruit is completely soft and tender. Let it cool slightly before attacking gently with a potato masher to help the process along. Then place a fine metal sieve over a large jug and using a ladle, transfer several spoonfuls into the sieve and gently push through. You will end up with just liquid and a very small amount of quite fine pulp running through. The rest of the fruit will need to be discarded. Repeat until all of your cooked fruit has been sieved.

IMG_0048

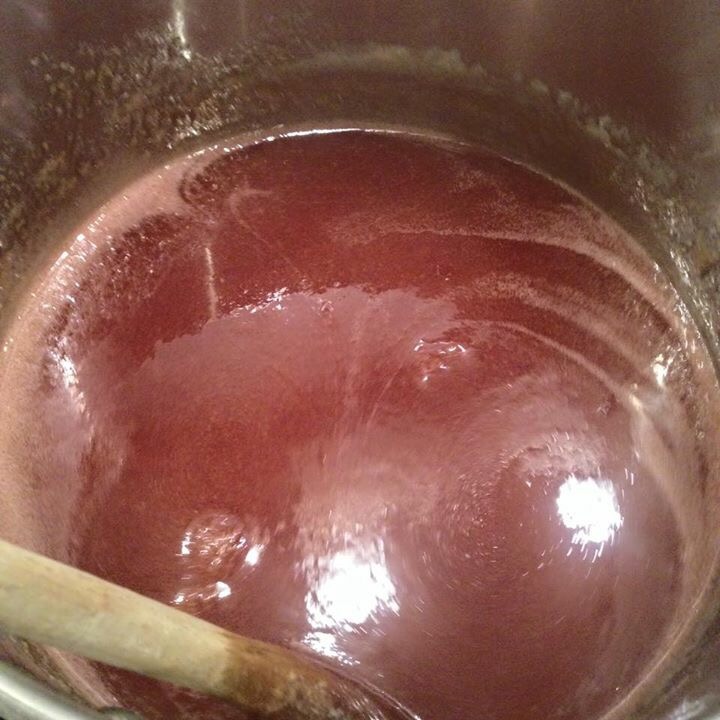
Measure the amount of fruit pulp you have ended up with in your jug and transfer to a large preserving pan. Then for every 150ml of this, add 100g of white granulated sugar. In this instance I had 2 litres of fruit pulp therefore I divided by 3 and multiplied by 2 to get the correct proportion which in this case is 1.66kg of sugar. Bring gently to the boil and simmer for around 45 minutes. The smell that engulfs your house is something quite spectacular and the colour changes to that of a blood orange. Complete magic and I found myself wondering if this was the first time this had been made in my almost 400-year-old farmhouse kitchen…

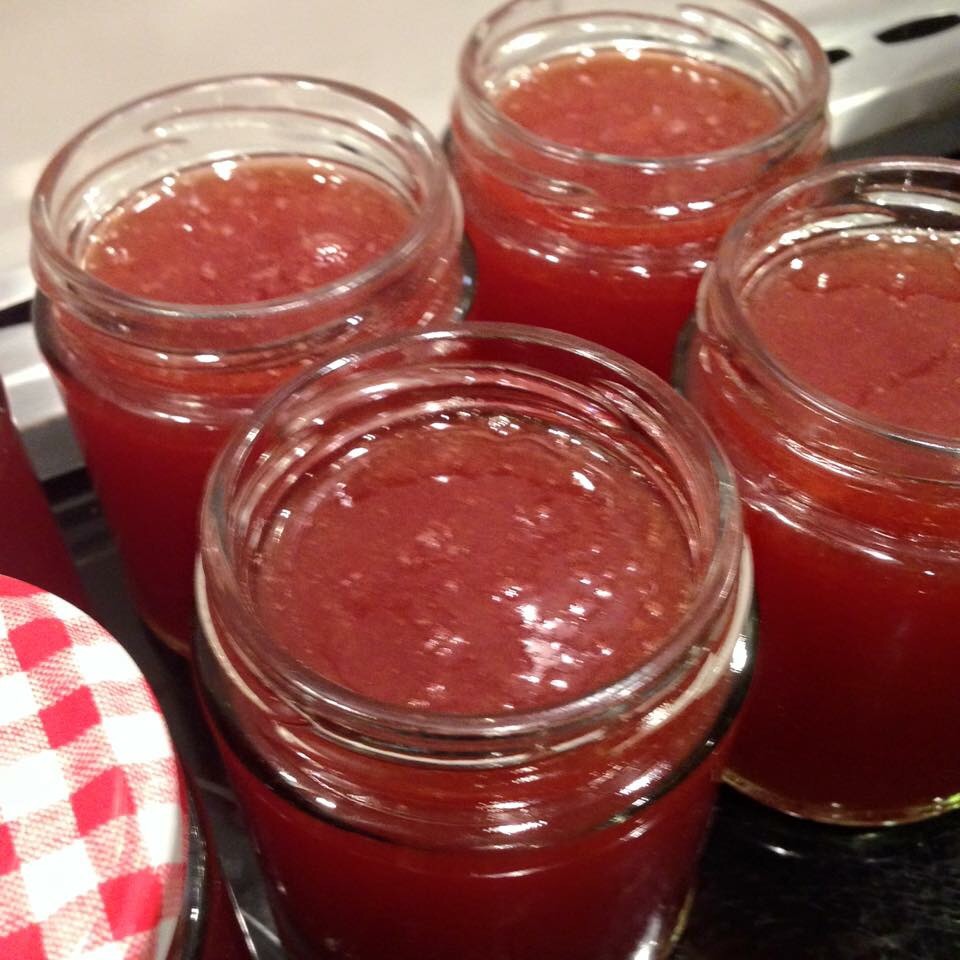
Allow to cool very slightly for around 10 minutes before using your clean ladle and a jam funnel to transfer into clean sterilised jars. After a few hours the jelly will be cooled and completely set. I have read that you need to leave this a month or two before you eat it but I will confess we tried it the next day with some bitter Parmesan and it was out of this world spectacular and every bit as good as the one we had in Edinburgh all those years ago. Traditionally in Spain, you would enjoy it with manchego.

It goes to show that sometimes nothing fancy is needed, just let good ingredients do the talking. Another fantastic example of preserving the season’s harvest and another dozen jars for me to store lol. My Christmas hampers are going to be bursting at the seams. Christmas… Eek! So excited already! 😉

Preserving the harvest…

Preserving nature’s harvest is one of my very most favourite phrases at this time of year and encapsulates everything that I think we should be doing. It actually gives me a case of the warm fuzzies. I absolutely love to grow things but when it all comes at once, it can be a bit overwhelming.

I’ve grown up with my mother always making odd chutney combinations of what ever she had a glut of and I think that this has perfused it’s way into my very being.

My chutney recipes now are only very loosely based on things I have done in the past, I very much make it up as I go along depending on what I have in front of me. Most weeks the hubster walks in from work on a Friday to find my pans hubbling and bubbling on the stove with jars in the sink and in the oven. Only in the last year or so have I actually started writing down what I do each time as we can be tucking into a chutney which everybody raves about, asks me for the recipe and I have to confess I have absolutely no idea what I did at the time because it was six months or a year ago! I’ve a few of my favourites listed on my recipes page.

But last year, someone threw me a curveball in and gave me the most spectacular gift. ‘Sun-dried’ tomatoes from her allotment. I was bowled over. Teeny, tiny little pockets of exploding tomato flavour like nothing I’ve ever experienced before. I knew it wouldn’t be long before I had to try to make them for myself!

So, a short discussion with my friend Mr Amazon later, and one food dehydrator was duly purchased.

My first foray I saw very much as a trial run so before committing hordes of my own homegrown tomato people, I bought some beautiful little baby plum tomatoes which were on special at the local shop. I bought eight punnets.

So this is what you do. All very straight forward. I followed the advice of said friend who had gifted me the originals as I like to call them.

Slice your tomatoes in half and lay them in the dehydrator cut side up. Sprinkle with Italian seasoning and salt and pepper. Turn on dehydrator and walk away. Do something else, go out, read a book, knit. Don’t stand and watch it and expect to see something happen as the magic takes hours my friends!

These went in at 65 degrees for eight hours. Then I removed the smaller ones that were leathery and left the bigger ones in for another hour.

Then they all had a sixty second dunk in red wine vinegar and got packed into jars. Now I believe from my research that these will keep quite happily in jars for some months. However, I wanted to replicate the jars stored in oil and so they got topped up with good quality extra virgin olive oil. I figure that once you’ve used the tomatoes, the oil will be fantastic. Whenever I make ciabatta, I always use the oil out of my sun-dried tomato jars in the fridge and not just plain stuff, gives a great extra little bit of flavour.
That’s it then!

They’ve come out brilliantly so I’ll be doing lots more to go into my Christmas hampers for the famalam. The way things are going this year, the hampers will be so big that I will need to provide a donkey to carry them too.

I’ve started experimenting with dehydrating my fresh herbs so check back for progress!

TTFN x

Falafel-ey Good!

So I’m a huge fan of making everything from scratch and some things are really so very simple, it does make you wonder why you ever bought them from a shop before! So here is a (sort of) recipe I’ve handed out on countless occasions to different people over the years. Much loved by veggies and meat eaters alike, and also a favourite with kiddiewinks.

One of the very best things about this is that I always have everything I need to make this in the cupboards so it is a perfect fast food when there looks like there is nothing in the fridge! They’re absolutely lovely cold so are perfect for picnics and go really well with a little home made hummus (also easy peasy lemon squeezy btw). Dang that’s another post I must write: The delights of homemade hummus. Yum. Dammit, I’m making myself hungry writing this.

Back to the falafel… It’s easy to scale up the recipe here. I use one tin of chickpeas as a starting point. It’s easy then to use another tin and double the other bits below or I’ve used kidney beans or butter beans on occasion too which are also grand.

A tin of chickpeas drained well 

A red onion

A couple of cloves of garlic (to your taste)

Some ground coriander, cumin, parsley and paprika. Again to your taste. Probably half a teaspoon of the two Cs then a quarter of parsley (fresh from your herb garden dans la summer months of course) and a sprinkle of paprika and a little salt and pepper.

Then a heaped tablespoon of flour and blitz in your food processor until it’s smooth-ish. Mix done. You should be able to shape it in your hands without it being too wet. Add a touch more flour if it’s a bit soggy. 

  
In fact these aren’t far off of a simple veggie bean burger if you added a little shredded carrot and green pepper, some sweetcorn and used a tin of mixed chilli beans (in water not sauce!) Can you see where I’m going with my approach here? There’s really nothing to it, just chuck it all together!

The above (one tin) makes four burgers which I shape and fry lightly on each side for 4-5 minutes until well coloured. Great in a burger bun with a slice of grilled halloumi over the top and some spicy summer relish. Or just on their own with some homemade herby potato wedges and serve with creme fraiche with some freshly chopped chives over the top. Ding dong fabulous.

You could add in sweetcorn, mashed sweet potato, spinach, anything you’ve got lying about really.

I will confess to recently purchasing a dirty fryer (a mini version of the ones you get in restaurants) recently. So if you want real proper little round morsels of Middle Eastern deliciousness, then the above mix will make 8-10 perfectly sized balls which you just pop into your fryer at 190 for around two minutes until golden brown. Drain and serve. You will not get better anywhere I can wholeheartedly promise you. 

  
Have a go and post your photos below of your work! It’s so easy I promise and takes literally five minutes flat. Barely longer than ripping open a packet! As I said before, they are great cold the next day so try putting into a pitta or a wrap with loads of fresh salad and some hummus. Glorious. Falafel-ey good in fact.

Oh no, not another bloody courgette! 

I feel that today needs a little fanfare really. It’s the day of my first courgette of the year. First of many I hope. As a longstanding vegetablearian I truly love these versatile veggies.

But my poor hubby, a caveman-esque manly meat eater with a great love of all things steak, did get fed up of the things last year.

The glut. Ah yes, you know it? The London bus syndrome of the vegetable world. You plant your seeds in March, then mother them daily until BOOM they become unruly teenagers one weekend when your back’s turned and the first fruits appear. Then they all arrive at once and grow at an unrivalled rate of knots.

So over the years, I have devised many many ways of using these little babies in all sorts of recipes… I’m not saying I sneak them in as such… Well yes, you’ve got me, sometimes I do. Don’t tell the hubster.

He suggested that I write a book. Oh no, not another bloody courgette! was born, in my mind at least. Basically this is what he would say to me every night when he got in from work from the onset of July’s first harvest.

Last night we enjoyed our first one of the year, it was sensational and in the form of one of my very favourite things, Zuchinni Fritti. I’m eagerly awaiting the next one and as supply becomes more plentiful, I shall stuff and batter up some flowers too. Prosecco chilling in the fridge? Check.

I’m going to list my recipes here as you’ll be needing them as we hit the season of plentiful harvest and I’ll write them all up as soon as I can with links to each one… So please sign up to my blog and keep checking back here for more recipes!!!

*Courgette and feta fritters

*Roasted courgettes with onions, halloumi and herbs

*Courgette and goats cheese quiche

*Courgette and pepper frittata

*Stuffed baked courgette boats

*Courgette soup

*Chocolate courgette cake

*Lemon courgette cake

*Zucchini fritti (healthy)

*Zucchini fritti (less healthy!)

*Courgette flowers

*Courgette and pesto tagliatelle

*Courgette lasagne

*Paneer & vegetable tikka kebabs – great for a BBQ

*Courgette & broad bean summer salad

*Courgette & goats cheese crostini

*Sweet courgette & apple chutney

*Spiced courgette chutney

*Spicy summer BBQ relish

I’d love to know if anyone has any more genius ways to use them… Please do share.

And one day I really will write that book I swear…

Bon appetit! X

We’re jammin’, we’re jammin’

We hope you like jammin’ too… 🎶

The fruit season is upon us, and I keep being bombarded on a daily basis with photographs on the allotment sites on Facebook of people with bucket loads of fruit asking what to do with it all. 

Not. Jealous. At. All. 

Sadly, although I’ve had a pretty good strawberry crop from my first efforts this year, the earwigs seem to think that I am offering some kind of Michelin star strawberry restaurant for them all. As soon as the strawberries go that perfect deep ruby red, Mr Earwig and chums have a nibble-a-thon and destroy the lot. I’m not quite sure what to do about it but I think I’m going to have to move all the plants elsewhere for next year. 

I have to confess to having serious jam withdrawal. Since we moved to the new house, my preserving pan has been confined to the larder cupboard but this weekend, I simply could not let the sunny days pass without doing some jammin’. So I trotted off to the PYO farm and picked a cardboard trug load of strawberries to replace the ones the earwigs stole. 

I’ve made plenty of jams in the past but never strawberry strangely and I need the perfect homemade one to serve with an afternoon tea I have planned in a couple of weeks. Some friends of mine have just got engaged and are coming round for tea to celebrate… I am planning scones and cream and jam and earl grey and bunting, the whole works. This is quite some celebration, he’s 93 years young. 

Everyone says how hard it is to get strawberry jam to set as strawberries are naturally low in pectin. So I decided to use jam sugar (not preserving sugar) with added pectin as well as the juice of a lemon. Seemed like common sense to me. 

Here is my recipe:

900g strawberries, freshly picked – take the stalk out and chop roughly 

800g jam sugar 

Juice of a whole lemon 

(Put a saucer in the freezer now)

Stick all of the above in a preserving pan and start attacking it all with a potato masher. I can’t abide lumps so this is for those who prefer a smoother consistency jam. Keep going until it’s all one big liquid bubbling away then keep stirring (wooden spoon) and keep boiling for ten minutes. Don’t stop stirring or you risk it catching on the bottom of the pan. 

They say you should boil to 105 degrees but I’ve got two thermometers and can never get above a hundred. So once you’ve hit ten minutes, grab your cold saucer from the freezer and pop a little bit of the jam mix on. If it starts to solidify and ‘skin’ straight away, it’s done. If not, bubble some more and check every minute. It certainly shouldn’t take more than 15 minutes total. 

Once you’re happy with the set, skim off any froth from the top with a large metal spoon and pop in half a teaspoon of butter.

 
Re jars, I am all about recycling so mine are old ones with labels soaked off, put through the dishwasher then in the oven at 100. Use a teatowel to get them out! I ladel my jam into a glass jug then pour into jars, do up the lid, then turn upside down to cool. 

Pop your dirty pan and equipment straight in the sink with washing up liquid and it will clean up perfectly. Leave it and you’ll be scrubbing like a mad person. 

That’s it, done. No problem with the set at all, in fact it’s pretty darn perfick as Pa Larkin would say. And the flavour is out of this world good. Now that I know how amazeballs this recipe is, I shall make a swimming pool sized load next week. 

 
Happy summertime peeps. Hopefully there will be some raspberry jam on the cards soon too… And maybe black currant? And then it will be blackberry season!!! Excited much? Heck yes. 

Must.Make.Scones.Now 

Middleclass Moonshine? Elderflower gin & liqueur…

Did you read you are cordially invited? You’ll see from there how fantastically summery elderflower cordial makes me feel…

The trouble I have each year with anything that involves collecting nature’s bountiful harvest, is that I find it hard to stop. And the cordial this year is unbelievably good. Please please make it, you’ll never look back and never want to drink even the best shop stuff again.

Cue a second mega batch of cordial and then a trawl of Google to see what else I could find for inspiration to preserve the deliciousness of these beautiful floral gems.

What’s that you said? Elderflower liqueur? Oooohhhhh. Mwahahahaha! Well I don’t mind if I do thank you very much for asking.

So I have made limoncello before, that had it’s good and bad points. A few years ago, after a trip to Italy where we drank the stuff on a daily basis, I decided that it would be a truly romantic notion to make my own. It was surely not too difficult? Merely a matter of soaking lemon rind in sugar and vodka for a month or so…

After a month of waiting very patiently, excitedly checking and staring at it every day, I prepared a lovely Italian meal, lasagne, tricolore salad, the full works. Then we tried the limoncello. It was like a cross between rocket fuel and fairy liquid. Disgusting. Epic fail of the highest order. And it looked for all the world like the plastic bottles that you see at the side of the road when you know a lorry driver has been caught short.

But then several months later, we had a New Year’s Eve party and the boys drunk our drinks cabinet dry. I found the hideous limoncello and gave them that thinking they would be too drunk to care. Turns out that after four months it had mellowed and was absolutely bloody delicious. And they’d drunk the lot before I realised. Lesson learned.

Anyhoo, methinks I shall try and make my very own middle class moonshine so here goes:

Grab a 2l Kilner jar, add 350g sugar

Peel two lemons with your potato peeler, add the rind to the jar


Wash your elderflowers really carefully by swirling them in clean water and snip the flowers from the stalks of around 15 heads and add to the jar


Top up with 1 litre of vodka!

Agitate (I don’t mean tell it you think yellow’s not it’s colour) and push the flowers under the vodka with a metal spoon

Leave in a darkened room for a month, strain and bottle. I sterilise bottles with boiling water and strain through cheesecloth btw.

And I’m going to advise leaving it a couple of months to mature, if my limoncello was anything to go by.

I did a cheeky thing as I couldn’t resist and thought I’d have a go inventing an elderflower gin too. Hey if you can do it with sloes…

Oooooohhhhh I can’t wait!

You are cordially invited…

So… it’s June… it’s almost midsummer’s day… AND IT’S FLIPPING RAINING! It’s so grim outside, after a delightful week, the weekend is grey and dreary and the heavens won’t stop tiddling. So I’m having a day in the kitchen. It’s quiche, bread pudding and elderflower cordial on the menu today.

Yesterday we actually ventured into a shopping centre for the first time in quite simply years as that is just something we never ever seem to do. It was quite surreal parking in a multi-storey and walking through a town I have to confess.

We were picking up some bits for hubby. My wedding anniversary present to him last week was a home brew beer kit – which he absolutely loved (dingding score with the present!) and so we needed to get a pressure barrel as the final part of the puzzle. While we were there, I tried to buy citric acid but they were all out of stock and the shop assistant actually laughed out loud at me when I asked for it. “You’re too late, the last one went this morning dear – I take it you’re making elderflower cordial?” Well, erm, yes, I am. Is everyone else too? Apparently so.

I finally managed to get some from our village pharmacy, picked up the last two packets they had. The chemist and the two assitants all nodded with a knowing smile and said “we all know what you’re doing this afternoon” lol.

Luckily we have elderflower all over the place in the fields here – do try and collect them from somewhere away from a road and the pollution that it brings. And don’t do what my mum once did and mistake it for cow parsley. That would not make for a nice brew, I’m quite sure.

elderflower

Okey dokey – so here is the recipe and how-to for anyone who’s not made this before. If you haven’t, please do – it just tastes of summer and sunshine and somehow captures everything about the fresh air and hedgerows all in a little bottle. It’s wonderful just as a cordial with water, sparkling water is quite delightful too if you’ve not tried that but if you are after a cocktail of summery-ness, then add a little snifter to a glass of prosecco. I promise you, you will want to make hoards of the stuff to last you all year. And what a great present for someone too. Who doesn’t love a home-made gift?

Preserving nature’s harvest. I just love it.

30 heads of elderflower (snip them off with scissors, take as little stalk as you can)

2.5kg white granulated sugar

80g citric acid

Two lemons (unwaxed)

1.5l water

So. Using a big preserving pan, pop in the sugar and the water and bring to the boil gently so that the sugar dissolves and it starts to boil, then take it off the heat. Yes I know, it’s a lot of sugar, but hey-ho, you only have a little bit at a time and far better you know what’s in your drink than buy stuff from shops that contains all sorts. This recipe makes somewhere around 3 litres, just over in fact, I think I ended up with six 500ml bottles and one 250ml so that’s 3250ml in total.

elder3

Peel your lemons (I use a potato peeler) then slice up and put into the pan once the sugar and water are dissolved and off the heat. Add your citric acid and stir. Fill your sink with clean cold water and rinse each elderflower head to get off any bugs and beasties or dead flowers then shake them off and add to your pan and stir. (Still no more heat at this point)

elderflower cordial
elderflower cordial

That’s it then, cover with a teatowel and leave overnight.

The next day, sterilise your bottles (I am a fan of the dishwasher method or the oven at 100 degrees rather than using steriliser which I find can leave a bit of a tang) and strain your cordial into a jug, then funnel into your bottles.

Boom-bang-a-bang. The bestest, most awesome elderflower cordial you’ve ever had in your life. Homemade with a little help from mother nature.

elderflower cordial
elderflower cordial

OH – I ALMOST FORGOT

So as you know I’m a user-upper-not-a-thrower-awayer. So with all that fabulous lemon peel, I took another sterilised bottle and popped it all in, then filled up with olive oil. So now I have a delightful lemon oil steeping away, ready to be used in about a month or so. Yummer scrummer indeed.

lemon oil
lemon oil

It might be raining outside, but my kitchen smells like sunshine 🙂

Toodlepip x

Ooooh, how I love a leftover.

How I love a leftover! Does that make me a User-Upper I wonder? Thrifty McThrifterson at your service Sir, how may I help?

Anyone who knows me will know that I have a great love for a leftover. Now I’m not just talking Christmas day dinner made into bubble and squeak the next day, (which is something to behold with a fried egg on top), I’m talking non food items as well.

I was genuinelly appalled this week to read that families in the UK throw away an estimated 20% off of the fresh food they buy each week. What an astonishing waste. Conversely I was taken aback with positivity reading that supermarkets in France are being fined for destroying unsold food and so are donating to charities or finding another use for it. It’s certainly a start and a move in the right direction.

Too many people go home and think ‘what do I want for dinner?’ I know people who go to the supermarket almost every day in fact. For me, it’s ‘what do we have and what needs using and how can I use it as the base for my dish tonight?’ Some of the best meals are made with random fridge finds and I always make enough for lunch the next day. It drives me mad seeing people buying plastic sandwiches for lunch when you can have something amazing with literally no more effort, just stick it in a plastic tub and off you go.

Back to green peppers and red tomatoes and Ready Steady Cook.

I think it’s important to have all of your store cupboard staples to hand and by these I mean things like tinned tomatoes, chickpeas, kidney beans, dry pasta, rice, couscous, quinoa then all of your herbs, fresh and dried. Frozen peas and sweetcorn too and I keep ’emergency’ frozen butternut squash too, that’s a revelation.

Random veg in your fridge you’re not sure what to do with? Pasta bake or vegetable lasagne. Cook them all off with tomatoes and herbs and stir through freshly cooked pasta or make a cheese sauce and get out that old packet of dry lasagne sheets from the back of the cupboard and layer up. Nom Nom Nom.

Got a limp pepper lurking in the bottom of the fridge? Don’t just bin him, chop him in half longways and stuff with couscous. Top with feta/halloumi/goats cheese, whatever you have. Triumphant.

Nothing much except far too much milk which runs out of date tomorrow? Macaroni cheese. That’s also great when you have leftover cheeseboard items lurking in your fridge. I’m very much a fan of Delia’s all in one cheese sauce method btw, though it goes against every ounce of my learning at school the ‘proper way’ to make a roux. Or a Michel as I like to call it.

My courgette fritters are a staple favourite and were born from a user-upper meal. You can change the ingredients slightly depending on what you have about. Sometimes I swap onions for leeks or feta for halloumi. Totally depends what’s in. I’ll post a how to when I make them next.

Aside from the food stuff leftovers, did you read my post Do you wanna shorten curtains? See that left me with a huge width of beautiful Laura Ashley Corby check fabric. Not quite enough depth to make cushions, but I couldn’t just throw it away and a few days later KABOOM! – the idea popped into my head to make a matching draught excluder. Just the thing for a 390 year old house.

So I measure the door, mock up the rough size in lining fabric, re-measure, all looks good so I go and find an old cushion inner that’s a bit flat loitering in the airing cupboard and cut him open to give me all the stuffing I need!!! I knew there was a reason I hadn’t thrown him away. Then I make the cover, cutting it 1cm bigger all round than the inner. Pin and then sew three edges on the reverse side, turn it in on itself so you have the correct side out. Put the stuffed liner inside, and to seal the last edge, turn it in on itself and seal across. If it needs more than a sponge down and a full on wash in the machine, it will go in just fine so I can’t see the point in making a removable cover.

Here he is! Taaaa-daaaahhhh! Matches the curtains perfectly and he was sort of free, made with just leftovers. Made in less than an hour and looks brilliant, I’m so chuffed. And nobody else has one quite like him 🙂

Earth me up Buttercup! ðŸŽ

Have you ever grown anything? Anything at all? A Mr Cress Head perhaps, a hyacinth in a 70s plastic vase where you could watch the roots growing? Or just good old tomatoes? Whatever you’ve done over the years, you’ll know the insane amount of satisfaction that comes from simply growing your own.

The excitement for me is immeasurable, seeing the first courgette flower appear or your potatoes sprouting above the ground and almost growing before your very eyes.

As a child I remember the neighbours down the road bringing up a trug of vegetables to us and me being sent back to them dutifully with homegrown tomatoes, some eggs from our chooks and a little loaf of bread my mum had made. Little did I know this was something that would remain ingrained in my very being for life.

Since living away from home, I’ve always grown all my own herbs and chillies on the kitchen windowsill and space permitting have been able to have a few growbags out the back of the kitchen door where I’ve produced enough courgettes, cucumbers, tomatoes and potatoes to keep myself and hubby going for the whole summer, with a few jars of chutney too when supply was plentiful.

But this year is different. I’ve graduated to grown-up-dom and I have a full on herb garden and some great big vegetable beds, totally dedicated to growing our own.

There’s something relaxing, satisfying and rewarding after a day at work to come home and water everything, seeing it change on a daily basis and think to yourself, I did that.

And there’s literally no better fast food in my mind than an omelette from local free range chooks filled with fresh herbs picked moments earlier from your garden. Put in whatever herbs you like and be bold. I know it sounds wrong but fresh mint in an omelette is something to behold. I use a selection of soft herbs so mint, parsley, sage, chives and basil. Trust me, chop them up and pop over some bitter Parmesan shavings with some seasoning and this is the most mighty omelette you’ve ever had. Try it, please.

At this time of year, everything is truly coming to life and today I’ve been earthing up my spuds. I’m growing some in bags as I’ve always done and some in the ground this year, a sort of experiment if you like to see which are better? Both are doing great thus far.

This year I’m doing all of my usual staples plus I’m adding in some butternut squash, beetroot, kale, sprouts, French beans, parsnips, strawberries and rhubarb. I’ll let you know how it goes and then when the time is right I’ll be sharing some of my favourite recipes from the book that’s been in my head for the last few years which is titled ‘oh no, not another bloody courgette’. I think you can guess what that’s about. This was last years first courgette of the season. A proud moment:

I won’t bore you with how to guides, I’m no expert to be honest. I’m more of a Have a go Harry. Or should that be Hannah? You can find great information on the RHS website but honestly every packet of seeds you buy tells you when and how to plant and really that’s it.

What I’d really like to see are more folk growing their own. In an age where cash is tight, and we all love a bit of organic, why not have a go? You don’t need huge amounts of space and even a little patio can give you a crop of delicious-ness in the summer. It doesn’t take much time, you just need to remember to water them daily if it hasn’t rained. And it’s so nice to eat veg that hasn’t come into your home wrapped in plastic.

Go on, have a go, I promise you’ll never want to eat a shop bought cucumber ever again.

Let there be cake…

I’ll be honest, I’ve never really been a cake genius, it’s something that has always sort of scared me. I’m much more of a savoury kind of girl anyway. Give me a choice between a bar of dairy milk or a packet of Quavers, I’m Quavers all the way. You’re one or the other don’t you think?

Anyway, I have a couple of friends who are seriously brilliant cake makers. You know who you are ladies. Decorating and everything – the full works. Their brilliance never ceases to amaze me. So whenever they bring cake, I’m always the one trundling behind with my home-made quiche. But nobody really raves much about quiche do they? Although to be fair mine is pretty good (modest), I’ve had a bit of practice. Even my mum likes it and she doesn’t like eggs. Hmmmm maybe I’ll have to do a little blog-ette about quiche. But for now:

Let there be cake!

So I went to quite an old-fashioned school where we were taught how to make a skirt in textiles class and we could all cook a three course meal by the age of 11 but when I left there, I didn’t even know how to turn on a computer and I don’t remember anything much about actual cake.

My nan was always a bread pudding and fairy cake baker but I don’t remember her making layered cakes. But I am obsessed by bake off (aren’t we all) and it led me to think I really ought to master the basics. Turns out I’m not the only one who finds proper baking just a little bit daunting. See the thing is, I’m more of an ‘intuitive’ cook shall we say. A maker-upper. I’m not really one for getting out a book and measuring a quarter of a teaspoon here and five grams there. But when you bake, it’s all about the science and that’s important.

I remember when I was a child going to the lady next door who I used to call Auntie Phyllis. She was so lovely and one of those ladies who always seemed to smell of cake whenever you saw her. I remember her showing me that the best way to make a sponge was always to weigh your eggs then go from there. Then it was just the same in SR flour, sugar and butter. See, that’s my kind of recipe.

So last year I decided I really ought to master the whole cake thing again at the ripe old age of 36. There are a few little tricks I’ve been shown by different people along the way so here is my totally foolproof way to make a sponge. It’s then easy to modify if you want to do a different flavour of any kind.

So:

Start with three big eggs, or four smaller ones. Weigh them in their shells… These btw are Jimmy eggs. Hubby has a friend called Jim with chooks and they’re laying lots right now – the fresher the better without a doubt. And I cannot hold in my unending love for an egg that doesn’t come with a date stamped on it.

Once you know your egg weight, weigh out exactly the same in SR flour and sugar and butter. If I don’t have enough butter, I use a bit of olive spread, it’s absolutely fine to do that. The butter needs to be soft (the total opposite of pastry grrrrr) so either leave it out of the fridge for an hour before you start or you can do a sneaky cheeky and pop it in the microwave for 30 seconds to soften.

Whip your butter and sugar together thoroughly, I have a KitchenAid mixer but you can do it by hand if you like. Then break your eggs into a jug and whip them well. Add a spoonful of self raising flour from your weighed out amount to stop the egg curdling and mix it all for a minute. Then sieve your flour in and mix that in with a metal spoon. That’s it. Nothing more to it. No jiggery pokery, no magic spells.

I use cake tins with loose bottoms as they have sides which go straight up and make better looking sponge cakes. If you use the fixed based ones then the sides go up at an angle and your Victoria sponge will look a bit like a flying saucer. (I was so proud of my very first Victoria sponge last year and then one of my friends said it looked like a flying saucer. I was utterly mortified and bought new tins the same day.) Line your base with grease proof paper and grease the paper and the sides of both tins.

Question: Do you put the tins on your greaseproof paper, draw around them and then cut them out? Want an easier and much more fun way to do it? See below… Just measure one whole width by eye so you have a square that’s the correct diameter, then fold, fold and fold again. Then cut the gentlest of curves at the top and unravel the origami and you will have a circle. I find this so quick and it makes me chuckle. It’s tempting to make a snowflake though I’ll warn you so rein yourself in peeps.


Drumroll….

Just like that!! (Tommy Cooper voice)

So pop your sponge mix in your tins, I use a plastic spatula to get everything out of the bowl. I quickly pop each tin on the scales to see I’ve got roughly the same amount of mix in each. Then give each one a gentle bang on the worktop to get any air bubbles out. Stick them in a pre heated oven about 180 for about 25 mins but as with anything all ovens are a bit different so just watch them and when they’re done, they’re done. Should be a nice golden even colour and if you stick a skewer it should come out clean.

Then let them cool. That’s the hard part.

This one is going to get some homemade lemon curd a patient brought me and some whipped double cream as its a bank holiday treat.  I most often just put a generous layer of homemade raspberry jam in though. That’s your traditional village fete style Victoria sponge. And then icing sugar of course, hovvering over with my teeny tiny sieve. Which. Hides. A. Multitude. Of. Cake. Sins.

Drumroll. Taaaaaa-daaaaah! (I say that a lot) She’s a thing of great beauty, I’m not going to be bashful about it.


Go on, have a go. Don’t be shy. It’s nothing to be scared of. Unlike spiders. They are to be terrified of. But cakes, they’re just pussycats.

Happy cake-ing one and all.